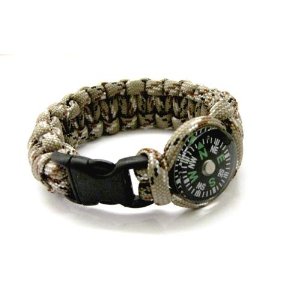
If you want to know how to make a survival bracelet, you have to understand that it requires plenty of attention. The steps are closely related, so you will need to focus in every step of the way.
If you are planning to go on a camping trip, it is important to that you wear a survival bracelet. In the most dire situations, it can spell the difference between life and death. It can also be worn as a fashion statement. However, the bracelet can be unravelled when things go out of control. When entangled, it is long enough to make knots, lashes, splints, and other items that’s useful in a survival situation.

Make your own Survival Bracelet or get one from Amazon. This one is available for just $4.99. Click on the pic for more details.
Listed below are the materials and the steps on how to make a survival bracelet.
Materials Needed:
- scissors
- lighter
- tape measure
- 10ft. 550 paracord
Steps on How to Make a Survival Bracelet:
- Measure and cut 2 ft. of the paracord.
- Hold both ends of the cord you cut earlier and slightly burn them with a lighter. This will melt the nylon and prevent fraying.
- Fold the cord in half and wrap it around your wrist. The loose ends should be slipped through the loop on the folded end.
- Then tie the loose ends with an overhand knot.
- Slide a finger under the cord, then gently remove the cord from your wrist and set it aside.
- The remaining portion of the paracord should be 8ft. Similar to the 2-foot cord you cut earlier, burn the ends to prevent fraying.
- Lay the cord. Once you see the middle of the cord, put the tied 2-foot section of cord.
- Form a T with the looped end and the knot forming the bottom on of T.
- The 8-foot section and the vertical looped cord should be held down with your left hand. Pull the cord from the right over the 2-foot section.
- The left side should make a backward S or a curvy Z. When form Z is visible, it is time to loop the left portion with it.
- Bring it over the vertical cord and then thread it with the horizontal cord. This will look like a pretzel.
- Both ends of the horizontal cord should be pulled tight, leaving an exposed loop at the end of the vertical cord. The knot should fit through this loop.
- Reverse the knot and loop the cord over the middle section of the S and under the vertical cord, then up and over the horizontal cord.
- Pull them tight to create a knot on the other side.
- Afterwards, you might want to test it on your wrist to see if it fits.
As has been previously stated, it takes a lot of focus to understand how to make a survival bracelet. It is strongly advised that you put yourself in an area where you will not be bothered by phone calls or friends and family members.
If you want to know how to make a survival bracelet, just check out the procedure above and follow them to the letter. Good luck!
Survival bracelets are available on Amazon through this link right here.